Setup Docmost on Ubuntu with Docker, Nginx, & SSL

Learn how to setup Docmost on Ubuntu 24.04 for collaborative documentation and wiki management. Step-by-step guide uses Docker, Nginx, and Let's Encrypt SSL.
What is Docmost?
Docmost is a powerful, open-source collaborative wiki and documentation software. It's an excellent choice for teams needing a centralized platform for knowledge creation, sharing, and real-time collaboration. Its features include a rich-text editor, support for diagrams (Mermaid, Draw.io, Excalidraw), a robust permissions system, spaces for content organization, integrated inline commenting, page history for version control, and powerful search functionality.
Prerequisites
Before we begin, ensure we have the following:
- An Ubuntu 24.04 on dedicated server or KVM VPS.
- Domain Name point A record to the server IP.
- Basic Linux Command Line Knowledge.
Setup Docmost on Ubuntu with Docker, Nginx, & SSL
Step 1: Update System Packages
It's crucial to start with an updated system to avoid any conflicts or missing dependencies.
sudo apt update && sudo apt upgrade -y
Install Essential Packages.
We need curl to download files and ca-certificates for secure connections.
sudo apt install ca-certificates curl -y
Step 2: Install Docker and Docker Compose
Docmost leverages Docker for easy deployment and management. We'll install Docker Engine and Docker Compose Plugin.
Install Docker Engine:
Add Docker's official GPG key:
sudo apt-get update
sudo apt-get install ca-certificates curl gnupg -y
sudo install -m 0755 -d /etc/apt/keyrings
curl -fsSL https://download.docker.com/linux/ubuntu/gpg | sudo gpg --dearmor -o /etc/apt/keyrings/docker.gpg
sudo chmod a+r /etc/apt/keyrings/docker.gpg
Add the repository to Apt sources:
echo \
  "deb [arch="$(dpkg --print-architecture)" signed-by=/etc/apt/keyrings/docker.gpg] https://download.docker.com/linux/ubuntu \
  "$(. /etc/os-release && echo "$VERSION_CODENAME")" stable" | \
  sudo tee /etc/apt/sources.list.d/docker.list > /dev/null
sudo apt-get update
Install Docker packages:
sudo apt-get install docker-ce docker-ce-cli containerd.io docker-buildx-plugin docker-compose-plugin -y
Verify Docker Installation:
sudo systemctl status docker
We should see "active (running)" in the output.
Step 3: Set up Docmost with Docker Compose
Now that Docker is ready, we'll configure Docmost using its Docker Compose file.
Create a Directory for Docmost:
We'll create a dedicated directory for Docmost to keep its configuration and data organized.
mkdir docmost && cd docmost
Download the Docmost Docker Compose File:
Docmost provides a pre-configured docker-compose.yml file.
curl -O https://raw.githubusercontent.com/docmost/docmost/main/docker-compose.yml
Generate a Secret Key:
Docmost requires a strong secret key for security. We can generate one using OpenSSL.
openssl rand -hex 32
Copy the generated key, as we'll need it in the next step.
Edit the docker-compose.yml File:
Open the docker-compose.yml file using a text editor (e.g., nano or vim).
nano docker-compose.yml
We need to modify a few environment variables:
APP_SECRET: Replace "REPLACE_WITH_LONG_SECRET" with the secret key we generated in the previous step.
POSTGRES_PASSWORD: Replace "STRONG_DB_PASSWORD" with a strong, secure password for the PostgreSQL database.
Make sure password matches the DATABASE_URL as well.
The relevant section in our docker-compose.yml should look similar to this (with our actual values):
services:
  docmost:
    image: docmost/docmost:latest
    depends_on:
      - db
      - redis
    environment:
      APP_URL: 'http://localhost:3000'
      APP_SECRET: '6698e396548e84beb0e78bf0f7d26eaa34a871a2ac4f36926394b84f6edc5f9d'
      DATABASE_URL: 'postgresql://docmost:STRONG_DB_PASSWORD@db:5432/docmost?schema=public'
      REDIS_URL: 'redis://redis:6379'
    ports:
      - "3000:3000"
    restart: unless-stopped
    volumes:
      - docmost:/app/data/storage

  db:
    image: postgres:16-alpine
    environment:
      POSTGRES_DB: docmost
      POSTGRES_USER: docmost
      POSTGRES_PASSWORD: STRONG_DB_PASSWORD
    restart: unless-stopped
    volumes:
      - db_data:/var/lib/postgresql/data

  redis:
    image: redis:7.2-alpine
    restart: unless-stopped
    volumes:
      - redis_data:/data

volumes:
  docmost:
  db_data:
  redis_data:
Start Docmost Containers:
From within the docmost directory, launch the services.
sudo docker compose up -d
This command will download the necessary Docker images and start the Docmost, PostgreSQL, and Redis containers in the background. We can verify the containers are running with:
sudo docker ps
Step 3: Install and Configure Nginx
Nginx will act as a reverse proxy, forwarding requests to our Docmost application and handling SSL termination.
Install Nginx:
sudo apt install nginx -y
Adjust Firewall (UFW):
If we have UFW enabled (which we should for security), allow HTTP and HTTPS traffic.
sudo ufw allow 'Nginx Full'
sudo ufw enable # If not already enabled
Create an Nginx Server Block for Docmost:
We'll create a new Nginx configuration file for our Docmost domain.
sudo nano /etc/nginx/sites-available/docmost.conf
Paste the following configuration, replacing docmost.example.com with our actual domain:
server {
    listen 80;
    listen [::]:80;
    server_name docmost.example.com;

    location / {
        proxy_pass http://localhost:3000; # Docmost's internal port
        proxy_set_header Host $host;
        proxy_set_header X-Real-IP $remote_addr;
        proxy_set_header X-Forwarded-For $proxy_add_x_forwarded_for;
        proxy_set_header X-Forwarded-Proto $scheme;
        proxy_http_version 1.1;
        proxy_set_header Upgrade $http_upgrade;
        proxy_set_header Connection "upgrade";
        proxy_read_timeout 900s; # Increased timeout for websockets
    }
}
Enable the Nginx Server Block:
Create a symbolic link to enable the configuration.
sudo ln -s /etc/nginx/sites-available/docmost.conf /etc/nginx/sites-enabled/
Test Nginx Configuration and Reload:
Check for any syntax errors and then reload Nginx to apply the changes.
sudo nginx -t
sudo systemctl reload nginx
Step 4: Secure Docmost with Let's Encrypt SSL
We'll use Certbot to automatically obtain and renew SSL certificates from Let's Encrypt.
Install Certbot and Nginx Plugin:
sudo apt install certbot python3-certbot-nginx -y
Obtain SSL Certificate:
Run Certbot to obtain an SSL certificate for our domain.
sudo certbot --nginx -d docmost.example.com
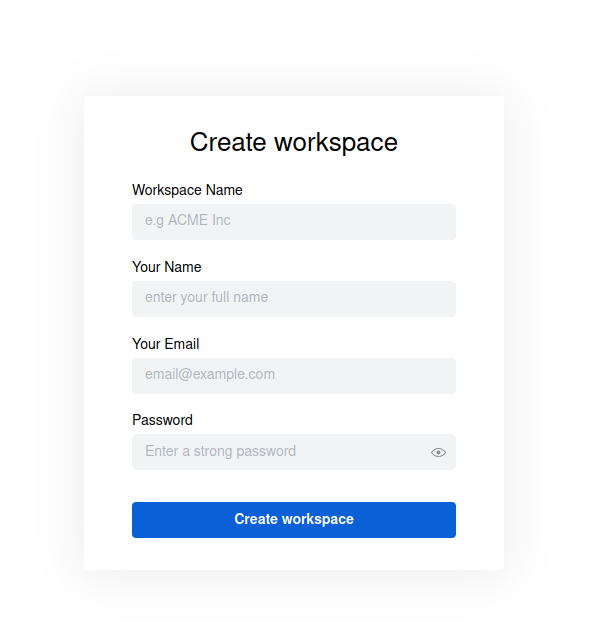
Step 5: Access Docmost
After completing all the steps, Docmost should be accessible via our domain.
Open Web Browser:
Navigate to https://docmost.example.com (replacing with our actual domain).
Conclusion
By following these steps, we've successfully set up Docmost on Ubuntu 24.04, leveraging Docker for containerization, Nginx as a reverse proxy, and Let's Encrypt for robust SSL security. This provides a stable, secure, and scalable environment for our team's collaborative documentation and wiki management needs.
Docmost offers powerful features like real-time collaboration, rich text editing, diagramming tools, and granular permissions, empowering our users to create, share, and manage knowledge effectively. We're now ready to empower our team with a centralized platform for all their documentation endeavors.
Checkout our low cost dedicated servers.
