How to Install Jenkins on Ubuntu 24.04

In this tutorial, we'll learn how to install Jenkins on Ubuntu 24.04 server.
Below is a comprehensive, step-by-step guide to getting Jenkins up and running on a Linux system. Follow these steps to install, configure, and kickstart your CI/CD pipeline automation with Jenkins. You can use this guide as a reference on your blog to help your readers automate their build, test, and deployment processes.
Prerequisites:
- A Ubuntu 24.04 installed dedicated server or KVM VPS.
- A root user or normal user with administrative privileges.
How to Install Jenkins on Ubuntu 24.04
Step 1: Prepare Your Linux Environment
Before installing Jenkins, ensure your Linux system is up to date and has the necessary prerequisites installed. Most tutorials assume you’re running a Debian-based distribution (like Ubuntu), but the steps are similar for other distributions with minor adjustments.
Update your system packages:
sudo apt update && sudo apt upgrade -y
Install essential packages:
These might include tools like wget or curl that you’ll need to download repository keys and files.
sudo apt install wget curl -y
Explanation:
Keeping your system updated minimizes conflicts and ensures compatibility. Tools like wget and curl help retrieve files from the internet during installation.
Step 2: Install Java
Jenkins is a Java-based application, so you’ll need to have Java installed. The recommended version is OpenJDK 11 or later.
Install OpenJDK 17:
sudo apt install openjdk-17-jdk -y
Verify the installation:
java -version
Explanation:
Java is the runtime for Jenkins. Verifying the installation confirms that Java is available and correctly set up on your system, which is critical before moving on.
Step 3: Add the Jenkins Repository and Key
To ensure you install the latest stable version of Jenkins, add the official Jenkins repository to your system.
Add the repository key:
sudo wget -O /usr/share/keyrings/jenkins-keyring.asc \
  https://pkg.jenkins.io/debian-stable/jenkins.io-2023.key
Append the Jenkins repository to your package sources:
echo "deb [signed-by=/usr/share/keyrings/jenkins-keyring.asc]" \
  https://pkg.jenkins.io/debian-stable binary/ | sudo tee \
  /etc/apt/sources.list.d/jenkins.list > /dev/null
Update package lists again to include the Jenkins repository:
sudo apt update
Explanation:
Adding the repository key and source ensures that your system trusts and can retrieve the latest Jenkins packages directly from the official repository. This keeps your Jenkins installation secure and up-to-date.
Step 4: Install Jenkins
With the repository in place, you can now install Jenkins using your system’s package manager.
Install Jenkins:
sudo apt install jenkins -y
Explanation:
The package manager takes care of downloading and installing Jenkins along with any dependencies. This method is straightforward and leverages your distribution’s package management system.
Step 5: Start and Enable the Jenkins Service
Once installed, you need to start Jenkins and enable it to run on boot.
Start the Jenkins service:
sudo systemctl start jenkins
Enable Jenkins to start at boot:
sudo systemctl enable jenkins
Check the status of the Jenkins service:
sudo systemctl status jenkins
Explanation:
Starting the service initiates Jenkins, and enabling it ensures that it automatically runs after a system reboot. Checking the status helps you verify that Jenkins is running without errors.
Step 6: Configure the Firewall
By default, Jenkins runs on port 8080. Ensure that your firewall settings allow traffic on this port.
Allow port 8080 through UFW (if you’re using UFW):
sudo ufw allow 8080
sudo ufw reload
Explanation:
Configuring your firewall is essential for ensuring that external users (or your own access from different networks) can reach the Jenkins web interface securely.
Step 7: Access Jenkins and Perform Initial Setup
Now that Jenkins is installed and running, it’s time to access the web interface to complete the setup.
Open your web browser and navigate to:
http://your_server_ip:8080
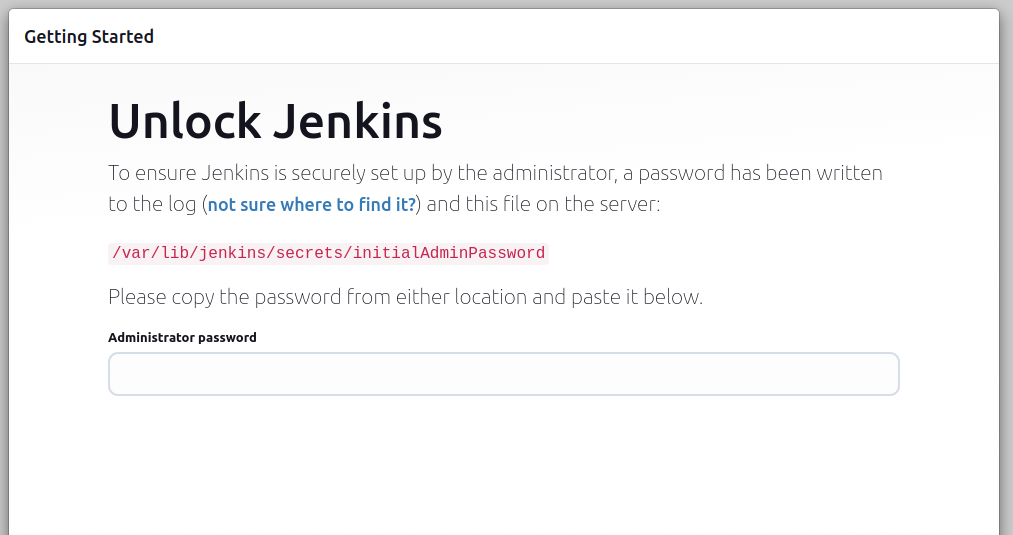
Retrieve the initial admin password:
When you first access Jenkins, you’ll be prompted to unlock it using a temporary admin password. Retrieve this password by running:
sudo cat /var/lib/jenkins/secrets/initialAdminPassword
Copy and paste the password into the setup screen:
This will unlock Jenkins and allow you to proceed with the configuration.
Install Recommended Plugins:
Jenkins will prompt you to install plugins. Choosing the “Install suggested plugins” option is recommended for beginners, as it provides a set of plugins that cover most common CI/CD needs.
Create your first admin user:
Follow the instructions to set up a new admin user account.
Explanation:
The initial setup is crucial as it configures the basic security and plugin ecosystem of Jenkins. Installing recommended plugins provides essential functionality out of the box, while creating an admin account secures your Jenkins instance.
Step 8: Configure Jenkins for Your CI/CD Pipeline
With the basic setup complete, you can now start customizing Jenkins to suit your CI/CD needs.
Set Up Credentials:
Navigate to the “Credentials” section in Jenkins to add credentials for accessing your source control repositories or deployment servers. This ensures that Jenkins can securely interact with your code repositories and remote servers.
Create a New Job or Pipeline:
- Click on “New Item” from the Jenkins dashboard.
- Enter a name for your job and select “Pipeline” (or “Freestyle project” if you prefer a simpler setup).
- Click “OK” to proceed.
Configure Your Job:
For a pipeline job, you can either define your pipeline in the web editor or reference a Jenkinsfile stored in your repository. A basic example of a pipeline script might look like:
pipeline {
    agent any
    stages {
        stage('Build') {
            steps {
                echo 'Building...'
                // Add build commands here, e.g., Maven, Gradle, etc.
            }
        }
        stage('Test') {
            steps {
                echo 'Testing...'
                // Add test commands here, e.g., unit tests
            }
        }
        stage('Deploy') {
            steps {
                echo 'Deploying...'
                // Add deployment commands here, e.g., SSH commands, Docker deployment
            }
        }
    }
}
Save and Run Your Job:
After configuring your pipeline script, save the job and click “Build Now” to run your pipeline.
Explanation:
Setting up credentials ensures secure access to your external systems, while creating a pipeline job is where you define the automation for building, testing, and deploying your application. The pipeline script provided is a basic template that you can expand according to your project’s requirements.
Step 9: Further Customization and Best Practices
As you become more comfortable with Jenkins, consider these additional steps for a robust CI/CD environment:
Install Additional Plugins:
Explore and install plugins that add capabilities like code analysis, notification integrations (Slack, email), and container support (Docker).
Set Up Automated Backups:
Regularly back up your Jenkins configurations and job data to prevent data loss.
Configure Build Nodes (Agents):
If your projects grow, set up additional agents (build nodes) to distribute the workload and reduce build times.
Secure Your Jenkins Instance:
Consider integrating Jenkins with LDAP/Active Directory for authentication, using HTTPS for secure connections, and regularly updating plugins and Jenkins itself.
Explanation:
Customization and best practices ensure that your Jenkins setup remains scalable, secure, and efficient as your project requirements evolve. These practices are essential for a production-grade CI/CD pipeline.
Conclusion
In this tutorial, we've learnt how to install Jenkins on Ubuntu 24.04 server. By following these steps, you now have a fully functional Jenkins instance on your Linux system. You’ve learned how to install and configure Jenkins, set up the initial administration and security measures, and create a basic CI/CD pipeline that automates the build, test, and deployment processes. With Jenkins at the heart of your automation, your development workflow can become more efficient, allowing your team to focus on delivering quality code.
Feel free to expand on this guide by adding real-world examples, integrating additional tools, and sharing best practices to help your users take full advantage of Jenkins for continuous integration and continuous deployment. Happy automating!
