Install Nginx Proxy Manager on AlmaLinux 9

In this tutorial, we'll learn how to install Nginx Proxy Manager on AlmaLinux 9 using Docker. Manage multiple websites, web applications single server.
Introduction
Nginx Proxy Manager is a powerful yet user-friendly tool for managing reverse proxy configurations. With this tool, system administrators can easily set up and manage reverse proxies, SSL certificates, and access control for multiple web applications. It simplifies the complexity of reverse proxy management, especially when you need to handle multiple configurations. In this tutorial, we’ll walk through the process of installing Nginx Proxy Manager on an AlmaLinux 9 server and show you how to use it effectively.
Prerequisites
Before proceeding, make sure you have the following in place:
- A Fresh AlmaLinux 9 dedicated server or KVM VPS.
- Root or Sudo Privileges: You should have sudo privileges to install packages and make system-wide changes.
- A Valid Domain Name (Optional but Recommended)
Install Nginx Proxy Manager on AlmaLinux 9
Step 1: Update Your AlmaLinux 9 Server
Before installing anything, ensure your system is up to date. Open a terminal or connect to your AlmaLinux 9 server via SSH, and run:
sudo dnf update -y
sudo dnf upgrade -y
This command updates all installed packages to their latest versions, ensuring stability and security.
Step 2: Install Docker and Docker Compose
Nginx Proxy Manager runs inside a Docker container, so you need to install Docker and Docker Compose.
sudo dnf config-manager --add-repo https://download.docker.com/linux/rhel/docker-ce.repo
Install the Docker package:
sudo dnf install docker-ce
Step 3: Create a Directory for Nginx Proxy Manager
To keep things organized, create a dedicated folder for Nginx Proxy Manager:
mkdir -p ~/nginx-proxy-manager && cd ~/nginx-proxy-manager
This folder will store all configuration files and data.
Step 4: Set Up Docker Compose for Nginx Proxy Manager
Now, create a docker-compose.yml file inside the folder:
nano docker-compose.yml
Then, paste the following configuration:
services:
  app:
    image: 'jc21/nginx-proxy-manager:latest'
    restart: unless-stopped
    ports:
      # These ports are in format <host-port>:<container-port>
      - '80:80' # Public HTTP Port
      - '443:443' # Public HTTPS Port
      - '81:81' # Admin Web Port
      # Add any other Stream port you want to expose
      # - '21:21' # FTP
    environment:
      # Postgres parameters:
      DB_POSTGRES_HOST: 'db'
      DB_POSTGRES_PORT: '5432'
      DB_POSTGRES_USER: 'npm'
      DB_POSTGRES_PASSWORD: 'npmpass'
      DB_POSTGRES_NAME: 'npm'
      # Uncomment this if IPv6 is not enabled on your host
      # DISABLE_IPV6: 'true'
    volumes:
      - ./data:/data
      - ./letsencrypt:/etc/letsencrypt
    depends_on:
      - db

  db:
    image: postgres:latest
    environment:
      POSTGRES_USER: 'npm'
      POSTGRES_PASSWORD: 'npmpass'
      POSTGRES_DB: 'npm'
    volumes:
      - ./postgres:/var/lib/postgresql/data
📌 What this file does:
- Runs Nginx Proxy Manager (jc21/nginx-proxy-manager) in a container.
- Exposes ports 80 (HTTP), 443 (HTTPS), and 81 (Admin UI).
- Uses a PostgreSQL database to store configuration settings.
- Stores SSL certificates and configuration files persistently.
Step 5: Start Nginx Proxy Manager
Now, launch Nginx Proxy Manager using:
docker compose up -d
The -d flag runs it in the background.
The first time you run this, it will download all necessary Docker images and set up the containers.
You can check if the containers are running with:
docker ps
Step 6: Access the Nginx Proxy Manager Web Interface
Once running, open your browser and go to:
http://your-server-ip:81
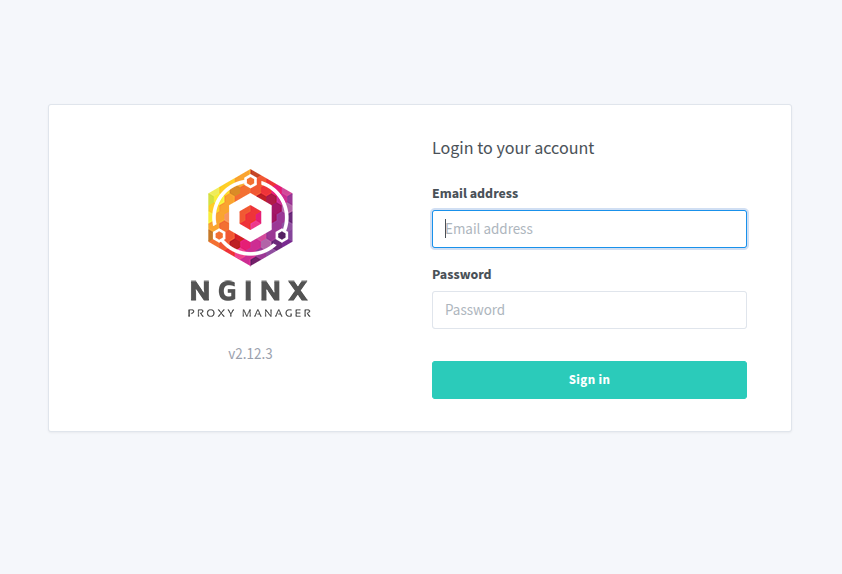
Default login credentials:
Email: admin@example.com
Password: changeme
📌 Important: After logging in, change the default email and password immediately.
Step 7: Configure a Reverse Proxy
Now, let’s configure a reverse proxy for a web service (e.g., an application running on port 8080).
7.1 Add a Proxy Host
1. Click on Proxy Hosts > Add Proxy Host.
2. Enter your domain/subdomain (e.g., example.com).
3. Set the Forward Hostname/IP to the server hosting the application (e.g., 192.168.1.100).
4. Set the Forward Port (e.g., 8080).
5. Enable Block Common Exploits.
6. Click Save.
7.2 Enable SSL (HTTPS)
1. Edit the Proxy Host you just created.
2. Go to the SSL tab.
3. Select Request a new SSL Certificate.
4. Enable Force SSL to redirect HTTP to HTTPS.
5. Click Save.
📌 Nginx Proxy Manager will automatically obtain a free SSL certificate from Let’s Encrypt!
Step 8: (Optional) Configure Access Control
If you want to restrict access to certain services:
- Go to Access Lists > Add Access List.
- Set a name (e.g., "Admin Only").
- Add allowed IP addresses (e.g., your office or home IP).
- Save and apply it to a Proxy Host.
This is useful for securing admin panels, private services, or staging environments.
Step 9: Managing and Monitoring
Restarting Nginx Proxy Manager:
docker compose restart
Stopping Nginx Proxy Manager:
docker compose down
Updating Nginx Proxy Manager:
docker compose pull
docker compose up -d
Conclusion
By following this tutorial, you’ve successfully installed and configured Nginx Proxy Manager on an AlmaLinux 9 server. You've learned how to deploy reverse proxies with ease, manage SSL certificates, and secure access to your web applications using a user-friendly interface. Whether you're managing a few websites or handling complex proxy configurations, Nginx Proxy Manager streamlines the process, making it easier to focus on other tasks while maintaining a solid and secure web infrastructure.
