Install Odoo ERP CRM on Ubuntu 24.04 Server

In this tutorial, we'll learn how to install Odoo ERP CRM on Ubuntu 24.04 server.
Odoo is a versatile open-source ERP and CRM solution that integrates a wide range of business applications—from accounting and inventory management to project planning and customer relationship management—into a single, user-friendly platform. Designed to streamline processes and improve efficiency, Odoo is highly customizable and scalable, making it a popular choice for businesses of all sizes.
Below is a detailed, step-by-step guide to deploy Odoo for Business Management (ERP/CRM) on an Ubuntu 24.04 server. This tutorial covers everything from installing required dependencies and PostgreSQL to configuring Odoo and optimizing it for production. Follow along carefully, and feel free to refer back to any step if you need clarification.
Prerequisites:
- A AlmaLinux 9 installed dedicated server or KVM VPS.
- A root user or normal user with administrative privileges.
- A domain name point A record to server's IP
Install Odoo ERP CRM on Ubuntu 24.04 Server
Step 1: Update Your System
Before installing anything, make sure your system is fully updated. Open your terminal and run:
sudo apt update && sudo apt upgrade -y
This command fetches the latest package lists and upgrades any out-of-date packages. A well-updated system minimizes conflicts later on.
Step 2: Install Essential Dependencies
Odoo is built in Python and relies on several libraries and tools to function properly. Install the required packages using:
sudo apt install -y python3 python3-pip python3-dev build-essential \
                     libxml2-dev libxslt1-dev libldap2-dev libsasl2-dev \
                     libssl-dev libpq-dev git wkhtmltopdf
Notes:
- Python3 & pip: Odoo is written in Python. The development headers (python3-dev) are needed for compiling some dependencies.
- Build Tools & Libraries: Packages like build-essential and libraries for XML, XSLT, LDAP, and SSL ensure that Odoo’s modules and integrations work as expected.
- wkhtmltopdf: This tool converts HTML reports to PDF. Odoo uses it to generate PDF reports. If you run into rendering issues, consider downloading the version recommended by Odoo’s documentation.
Step 3: Install and Configure PostgreSQL
Odoo uses PostgreSQL as its database engine. Install PostgreSQL by executing:
sudo apt install -y postgresql
Once installed, create a PostgreSQL user dedicated to Odoo. Switch to the postgres user and create the user with database creation rights:
sudo -u postgres createuser --createdb --no-createrole --no-superuser odoo
This command creates a new database user named odoo which Odoo will use to connect to the database. No password is set here, as we’ll configure the database connection through Odoo’s configuration file (you can add one later if desired).
Step 4: Create a Dedicated System User for Odoo
It’s best practice to run Odoo under its own system user. Create this user and assign a home directory:
sudo adduser --system --home=/opt/odoo --group odoo
This command creates a system account named odoo with its home directory at /opt/odoo. Running Odoo under its own user enhances security and simplifies permission management.
Step 5: Download Odoo
You can obtain Odoo either from the official repository or by cloning the source code. Here, we’ll use Git to clone the latest stable branch (for example, version 18.0):
sudo git clone --depth 1 --branch 18.0 https://github.com/odoo/odoo.git /opt/odoo/odoo
--depth 1: Downloads only the latest commit, which speeds up the process.--branch 18.0: Adjust this if you want a different version.
Step 6: Set Up a Python Virtual Environment and Install Python Dependencies
Using a virtual environment keeps Odoo’s Python dependencies isolated from system-wide packages.
Create and activate the virtual environment:
cd /opt/odoo
python3 -m venv odoo-venv
source odoo-venv/bin/activate
Upgrade pip and install the wheel package (which aids in installing binary packages):
pip install --upgrade pip wheel
Install the required Python packages from Odoo’s requirements file:
pip install -r odoo/requirements.txt
If you encounter any errors during package installation, check that all development libraries (installed in Step 2) are in place.
Step 7: Create the Odoo Configuration File
Odoo needs a configuration file to know where to find its modules, which database user to use, and other parameters. Create a new configuration file at /etc/odoo.conf:
sudo nano /etc/odoo.conf
Paste the following content into the file:
[options]
; This is the Odoo configuration file.

; Specify the location of additional addons if needed
addons_path = /opt/odoo/odoo/addons

; Set a master password for database management via Odoo’s web interface.
admin_passwd = admin

; Database connection settings
db_host = False
db_port = False
db_user = odoo
db_password = False

; Log file location for debugging and monitoring
logfile = /var/log/odoo/odoo.log

; Production performance settings (tweak these based on your server’s CPU/RAM)
workers = 2
limit_memory_soft = 2147483648
limit_memory_hard = 2684354560
limit_time_cpu = 60
limit_time_real = 120
Explanation of Key Options:
- addons_path: Tells Odoo where to find its modules.
- admin_passwd: This password is used to secure the Odoo database manager. Change it to a strong password before going live.
- db_host / db_port: Set to False to use a local database connection.
- workers: In a production environment, set the number of worker processes to match your CPU cores (roughly 2 workers per core is a common starting point).
- limit_memory_soft/hard and time limits: These help prevent runaway processes from consuming too many resources.
Adjust the numbers based on your server’s capacity and the expected load.
Secure the configuration file by setting appropriate permissions:
sudo chown odoo: /etc/odoo.conf
sudo chmod 640 /etc/odoo.conf
Also, create a directory for Odoo logs:
sudo mkdir /var/log/odoo
sudo chown odoo: /var/log/odoo
Step 8: Set Up a Systemd Service for Odoo
To manage Odoo as a service (start, stop, restart, enable at boot), create a systemd service file:
sudo nano /etc/systemd/system/odoo.service
Insert the following content:
[Unit]
Description=Odoo Business Management
Requires=postgresql.service
After=network.target postgresql.service

[Service]
Type=simple
User=odoo
ExecStart=/opt/odoo/odoo-venv/bin/python3 /opt/odoo/odoo/odoo-bin -c /etc/odoo.conf
StandardOutput=journal+console

[Install]
WantedBy=multi-user.target
What this does:
- User=odoo: Runs the service as the odoo user.
- ExecStart: Points to the Python executable in the virtual environment and runs odoo-bin with the configuration file we created.
- Requires & After: Ensure PostgreSQL is running and the network is ready before starting Odoo.
Reload systemd to apply the new service:
sudo systemctl daemon-reload
Then enable and start Odoo:
sudo systemctl enable odoo.service
sudo systemctl start odoo.service
Check the service status with:
sudo systemctl status odoo.service
If everything is working correctly, you should see that the service is active (running).
Step 9: Configure Firewall
We need to configure firewall to allow HTTP and HTTPS port:
ufw allow 80/tcp
ufw allow 443/tcp
Step 10: Perform the Initial Web Configuration
Install Nginx for web server
sudo apt install nginx
Next, create Nginx configure file
nano /etc/nginx/sites-available/odoo.conf
Copy and paste following content:
server {
    listen 80;
    server_name yourdomain.com;
    location / {
        proxy_pass http://127.0.0.1:8069;
        proxy_set_header Host $host;
        proxy_set_header X-Real-IP $remote_addr;
        proxy_set_header X-Forwarded-For $proxy_add_x_forwarded_for;
        proxy_set_header X-Forwarded-Proto $scheme;
    }
}
Next, create a symbolic link:
ln -s /etc/nginx/sites-available/odoo.conf /etc/nginx/sites-enabled/
Test and restart the Nginx service:
nginx -t
sudo systemctl restart nginx
Now, configure SSL certificate. We are using Let's Encrypt to install SSL certificate.
Install Certbot
apt install certbot python3-certbot-nginx
Now, obtain the SSL certificate:
certbot --nginx -d odoo.example.com
Now that the Odoo service is running, open your web browser and navigate to:
https://your_domain_name
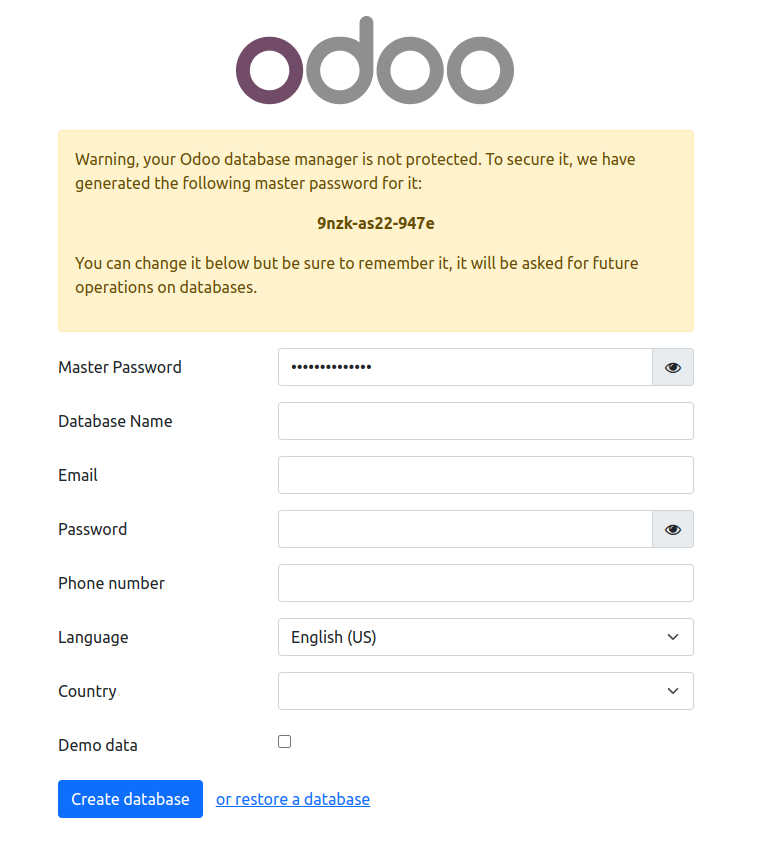
You’ll be greeted with Odoo’s setup wizard. Here you can:
- Create a new database: Enter the master password (as set in
/etc/odoo.conf), choose a language, and select any demo data if required. - Use database name:
odoo - Select modules to install: Odoo offers modules for accounting, inventory, project management, CRM, and more. Pick those relevant to your business needs.
- Go through the wizard to complete the installation and initial setup.
Step 11: Optimize Odoo for Production
For optimal performance in a production environment, consider the following adjustments:
Worker Configuration:
In the configuration file (/etc/odoo.conf), the workers setting is crucial. A common rule is to allocate roughly 2 worker processes per CPU core, though you must balance this with available memory. For example, if your server has 4 cores and enough RAM, set workers = 8.
Memory Limits:
The settings limit_memory_soft and limit_memory_hard help manage how much memory each worker can use. Monitor your server’s performance and adjust these values to prevent Odoo from consuming too many resources.
Reverse Proxy Setup (Optional):
For improved security and SSL termination, consider placing a reverse proxy like Nginx in front of Odoo. An example Nginx configuration might look like this:
Database Tuning:
Optimize your PostgreSQL settings to suit the expected workload. Tools like pgTune can help adjust parameters such as shared buffers and work memory.
Monitoring and Logging:
Regularly check the Odoo log file at /var/log/odoo/odoo.log and use system monitoring tools to track CPU, memory, and disk I/O. This helps you fine-tune the performance over time.
Final Words
In this tutorial, we've learnt how to install Odoo ERP CRM on Ubuntu 24.04 server. This installation provides a robust ERP/CRM system with modules that cover accounting, inventory, project management, and more. By following these detailed steps, you can ensure that Odoo is properly configured, optimized, and ready to handle your business management needs.
Remember that every environment is unique—monitor your system’s performance and adjust configurations as necessary. Happy deploying!
